Since page speed is as important as ever for ranking high on the Google SERPs, WordPress website users are always in search of something out of the box and by aiming to achieve high page speed. To monitor and test your website’s performance, you can use a number of online tools such as Google PageSpeed Insights, GTMetrix, and Pingdom.
If you’re interested in topping 90 on your Google PageSpeed Insights score, you need every possible tool in the toolbox to get there including leverage browser caching! To leverage browser caching is a way to make your website faster, but instructing the browser to store or “cache” files for some time, so that they don’t have to be downloaded again on a subsequent visit. That’s all this means in short.
In this guide we will explain what browser caching is, how it works, and the ways you can manipulate it on your WordPress website.
What is Browser Caching?
Browser cache or temporary Internet files are a way that browsers download website images, data, and documents for faster viewing in the future. By keeping a local copy of some website information, your browser will be able to load at least some information from each page you have visited without downloading that information again from the server. This can decrease the time it takes to load a webpage. The downside is that the information on a website may have changed while your browser loads an older version.
Whenever a person visits your website, the browser sends a request to load assets such as HTML, Scripts, Images, CSS, etc. from the server. The server then responds to the browser’s request. Depending on the size of the asset requested and server process time, the response may take a bit of time to respond. It ultimately results in increased load on the server and slows down the website on the user’s end. The whole idea behind caching is to “save” an up-to-date version of your website for visitors to access it more quickly.
To avoid an unwanted slowdown for users and excessive strain on your web server, let’s quickly walk through browser caching in WordPress, what the leverage browser caching error is, and how to fix it.
What Does It Mean to Leverage Browser Caching?
For those who don’t know what Leverage Browsing Caching is, it’s caching represents the amount of time that browsers locally store the cacheable resources available on a website.
These resources include images, JavaScript, CSS,and others. Whenever a person accesses the website, the cacheable resources which are stored on your computer are uploaded back. The loading speed of the website is thus improved visibly. This is the reason why people want to use Leverage Browsing Caching in WordPress.
If you run a website, you should be aware that server caching refers to the process where your website generates cached web pages for your website. This is server-side – the browser caching is what happens when users access your website in their web browser.
This is the other side of the same coin. When you leverage browser caching, you’re providing instructions for your server on how long the resources should be cached in the browsers of your visitors.
Typically, in order to leverage browser caching, you need to define HTTP headers to set proper expiry times for different file types on your website. How you do this will depend on whether your web server runs on Nginx or Apache, and whether you want to enter the code yourself or use a WordPress plugin.
Below, we’ll cover some of the common ways to configure your browser caching.
How Does Leveraging Browser Caching Speed Up WordPress?
When you visit a website, clicking on a link or typing in a web address initiates a call to that site’s server. The server gets the call, retrieves the necessary information (which can include images, coded files like HTML and CSS, and so on) and sends them out to be displayed for the user.
While this usually takes moments, a delay of only two or three seconds puts you at risk of losing traffic. Fortunately, browser caching can improve page speeds for WordPress websites.
Fixing the Leverage Browser Caching Error
If you are using one of the recommended servers for WordPress you can manually manage your browser cache settings and set up WP fastest cache settings.
This is accomplished by configuring a header in your website’s .htaccess file.
.htaccess is a configuration file that contains important directives for your WordPress server. To access it, you’ll need to use a File Transfer Protocol (FTP) application such as FileZilla or CuteFTP.
If your host offers Secure FTP (SFTP) access, it’s best to use that to locate and edit the file in the root directory of your WordPress website. Since the file name begins with a period, you may have to enable hidden files in your FTP/SFTP client.
To fix the “Leverage Browser Caching” warning, you will have to perform the following two steps.
- Change request headers to use cache
- Optimize caching policy
1. Change Request Headers to Use Cache
One way to improve your website speed and response is to change request headers to use the cache. We are going to add a few lines of code to our WordPress .htaccess file.
To leverage browser caching in WordPress, access the main directory of your WordPress installation, search for the .htaccess file and open it with any code editor. Simply, paste the below-stated lines at the top of the WordPress .htaccess file.
## EXPIRES CACHING ##

<IfModule mod_expires.c>

ExpiresActive On
ExpiresByType image/jpg "access 1 year"
ExpiresByType image/jpeg "access 1 year"
ExpiresByType image/gif "access 1 year"
ExpiresByType image/png "access 1 year"
ExpiresByType text/css "access 1 month"
ExpiresByType text/html "access 1 month"
ExpiresByType application/pdf "access 1 month"
ExpiresByType text/x-javascript "access 1 month"
ExpiresByType application/x-shockwave-flash "access 1 month"
ExpiresByType image/x-icon "access 1 year"
ExpiresDefault "access 1 month"

</IfModule>

## EXPIRES CACHING ##
2. Optimize Caching Policy
The second step to speed up response time on your website is to Optimize Caching Policy. The above code describes file types and their expiries. It’s totally up to you, how much time you want to store specific static content in the user’s browser cache. If your static content like images is long-term. I would suggest you set them for a year. However, the content you suspect that can be changed in the near future, it is suggested that you set the expiry date for at least a month.
Cache-Controls
If the above method fails to work on your server, we have another alternative around that can help you out with cache-controls to set caching expiry. All you have to do is copy and paste the following lines at the top of your .htaccess file.
# 1 Month for most static assets

<filesMatch ".(css|jpg|jpeg|png|gif|js|ico)$">
Header set Cache-Control "max-age=2592000, public"

</filesMatch>
Same as the previous step, the above code describes the expiry and caching policy of different file types.
Note: 2592000 seconds = 30 days. This is the minimum value that can eliminate the warning. If the expiry is less than this, you might still see the leverage browser warning, suggesting to increase the expiry.
Server Configuration
If you are not using Apache to run WordPress, it’s likely you might be using Nginx. This is the other server that is recommended by WordPress. In this case, you still have some control over how long your files are cached by the browser.
However, you’ll need to do some server configuration first. If you’re not familiar with Nginx, this will require using Terminal to execute instructions and changes through the command line.
Leverage Browser Caching on NGINX Servers
Your first step is to check your current cache settings. You can do that by sending a request in Terminal to an image file on your website. You should receive the header information in return.
If you decide you want to make adjustments to your cache settings, you can start with the following two directives to enable basic caching with Nginx:
The first directive is how you’ll set the path and configuration for the cache, and the second directive is what activates the new caching rules.
Nginx also has an in-depth guide available for more ways to enhance your cache options. It includes directives for establishing shared memory zones for storing cache keys, and much more.
WordPress Leverage Browser Caching for Google Analytics
If you are using any WordPress plugin for Google Analytics, you may still get leverage browser caching warnings, doesn’t matter if you set up everything correctly.
It is because Google Analytics set the default expiry time for only two hours to make sure you get updates as fast as possible.
There are two ways to leverage browser cache warnings for Google Analytics.
- Local: You can create a local copy of analytics.js and/or ga.js (whatever file you are dealing with leverage browser cache). Please note that Google does not recommend this method.
- Plugin: Use Complete Analytics Optimization Suite (CAOS) WordPress plugin that hosts your Google Analytics file locally and use wp_cron() to keep it updated.
Using Plugins to Leverage Browser Caching
If you’re running a WordPress website, you may be able to skip the more involved coding steps outlined later in this post and just use some quality WordPress plugins to leverage browser caching.
W3 Total Cache
One of the best plugins for efficient leverage browser caching is W3 Total Cache. This is a free plugin that helps improve SEO and user experience for your site by reducing load times. It’s a complete caching framework, which means you can handle pretty much every aspect of caching from a single place! Let’s install in on our TopTen WordPress theme!

So, are you ready to use W3 Total Cache to leverage browser caching? Here’s how it’s done!
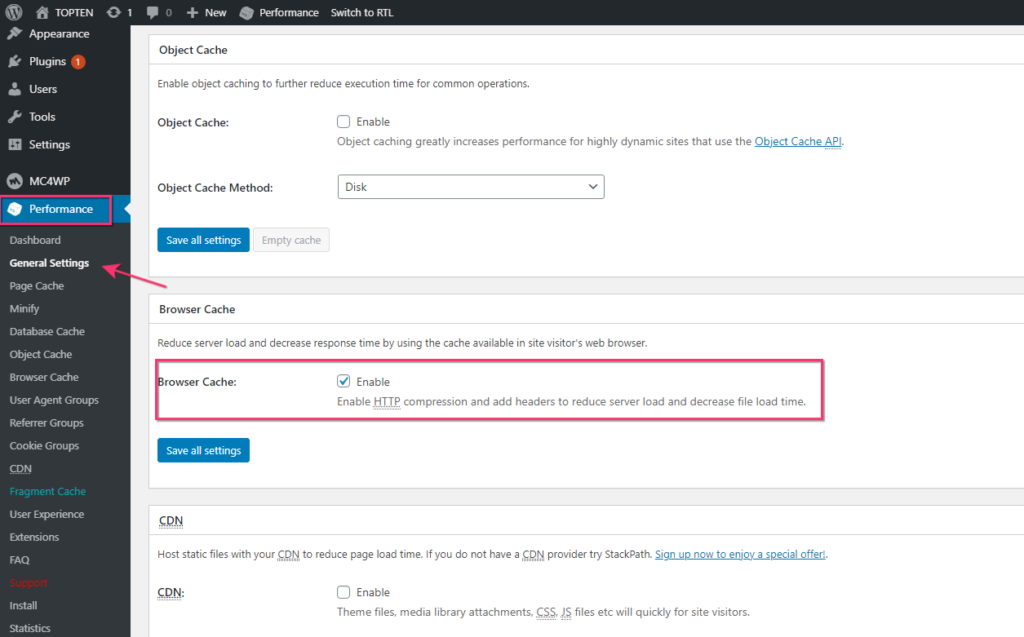
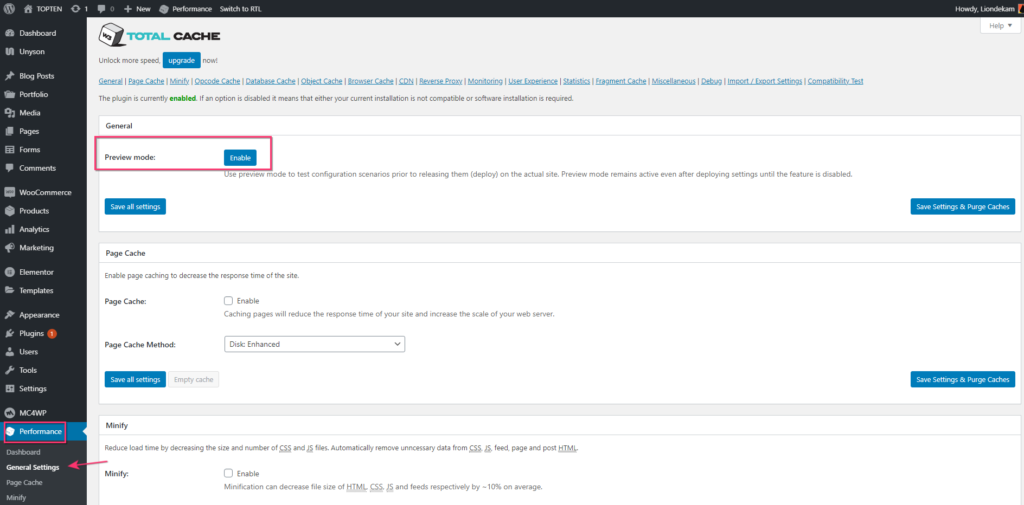
Step 1: Enable Browser Caching
After installing and activating W3 Total Cache (W3TC), you can start to tweak the settings to leverage browser caching.
First, go to General Settings under the Performance tab in your WordPress dashboard sidebar. This is where you’ll be able to adjust the settings.
Scroll down to the Browser Cache and make sure that the browser cache Enable box is checked.
Step 2: Specify Global Browser Cache Policy
After you’ve enabled browser caching, click Browser Cache in the plugin options to go to that page. There, you’ll find a list of settings for global browser cache policy that you can customize.
The check boxes include several options for how to leverage browser caching on your website. It’s a good idea to check all of the top boxes.
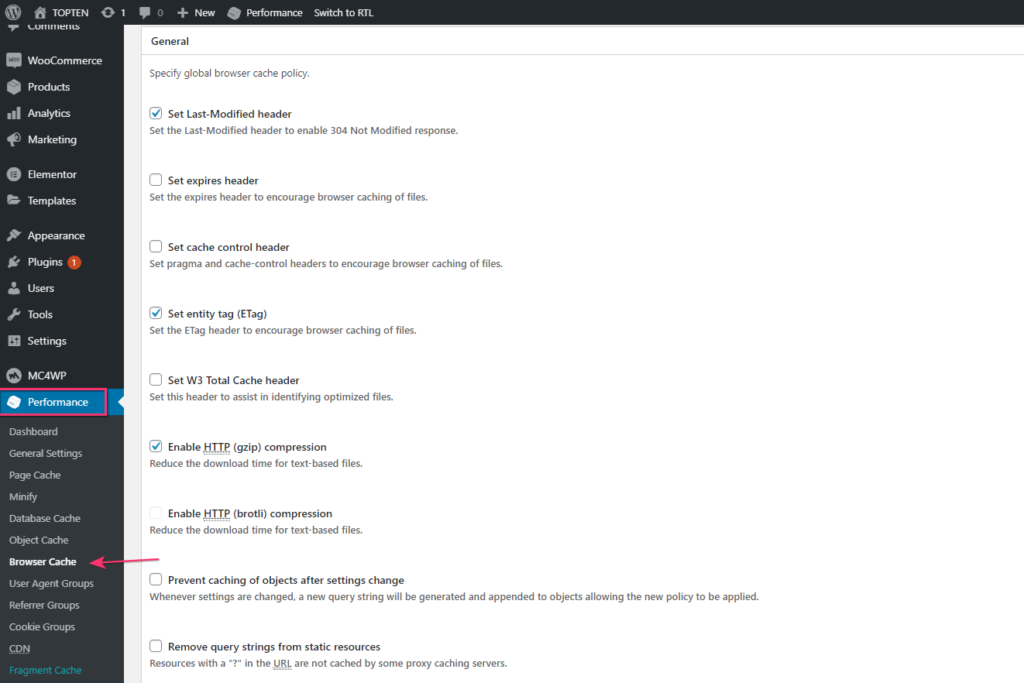
- Set expires header – The expires header is an expiration time of an entity of the web, whether an HTML document, CSS file, image, etc. The length specified in this header will control how long the cache of the entity is valid.
- Set cache control header – The cache control header is an additional header to encourage browser caching.
- Set entity tag (eTag) – The eTag is a validation tag that makes browser caching more efficient.
- Set W3 Total Cache Header – This is a header set by W3TC to assist in identifying optimized files.
- Enable HTTP (gzip) compression – Gzip compression will reduce the download time for text-based files.
With these global settings for browser caching enabled, you’re now able to manually adjust the appropriate headers for your site.
Step 3: Specify Cache Headers
As you’ll see in the Apache and Nginx sections of this post, a significant step in leveraging browser caching is specifying the cache headers. Specifically, you need to tell users’ browsers how long to hold onto cached elements before they expire using specialized commands.
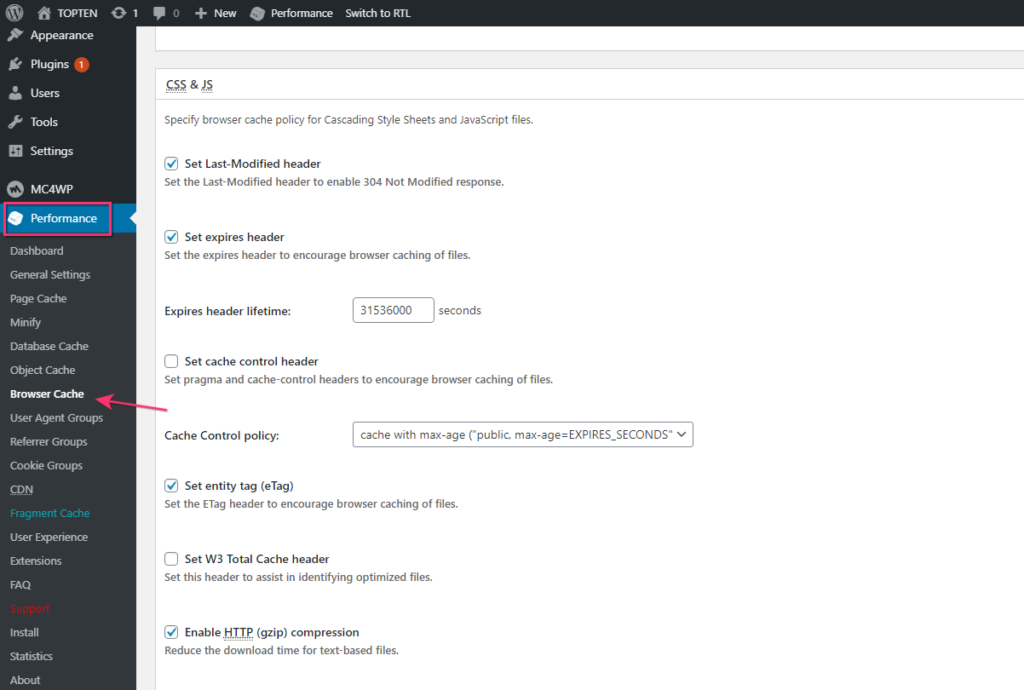
You can make adjustments to the header lifetime for the following file types:
- CSS & JS files
- HTML & XML files
- Media & Other files
They’re measured in seconds. As an example, for CSS & JS files, you’ll want to shoot for the equivalent of two weeks, or 604800 seconds.
Ultimately, the amount of time different elements are cached is up to you. It comes down to testing to see what works best.
You may want to use W3 Total Cache’s built-in preview mode to test changes before you actually deploy them, which you can find under General Settings.
WP Fastest Cache
WP Fastest Cache is another plugin that you can use to activate Leverage Browsing Cache in WordPress. It is even simpler to activate than the previous plugin. Let’s see how to do it following the example of our TopTen WordPress theme.
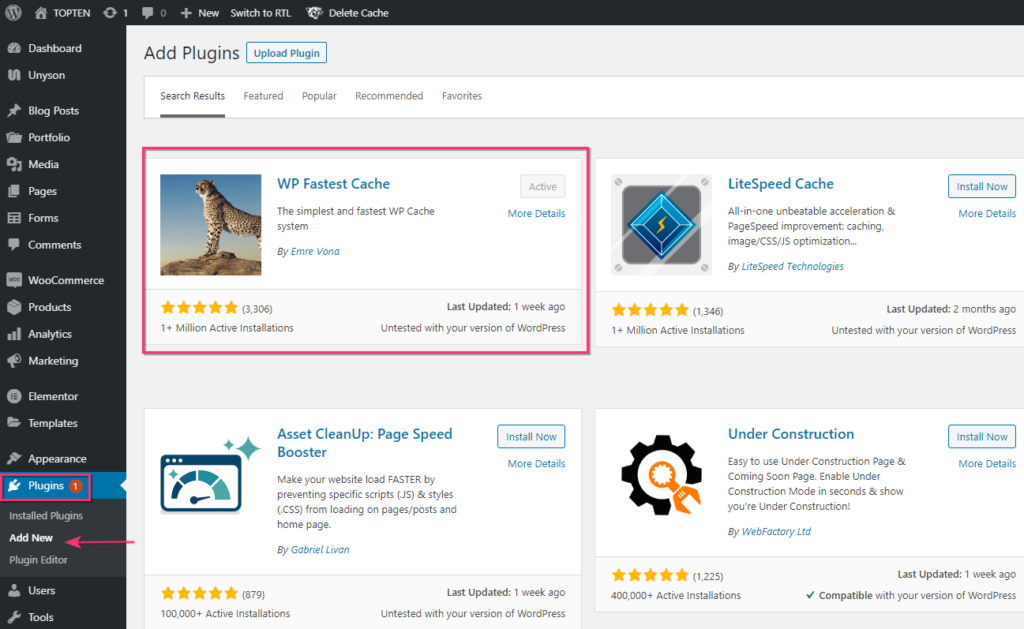
- Download and install the WP Fastest Cache.
- Go to plugin settings and select Browser Caching by checking the box
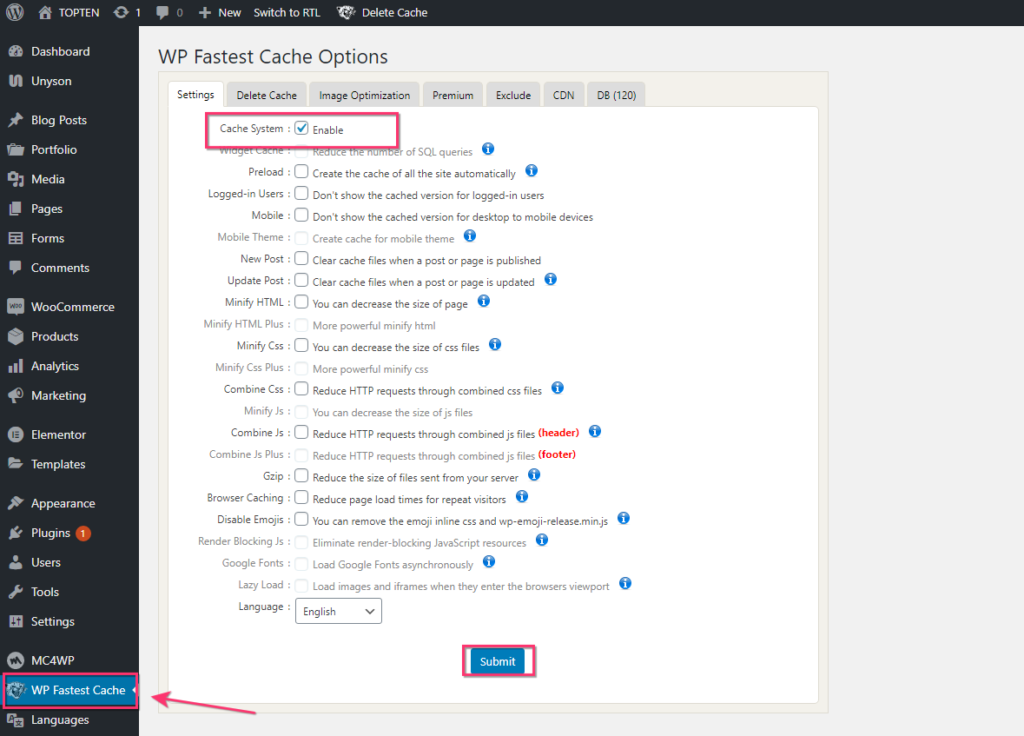
- Click on submit to apply the changes and that’s it!
WP Rocket
This is one of the fastest, most recommended plugins for WordPress, especially premium WordPress themes such as TopTen or Seosight, which can handle all your speed optimizations with a few clicks.
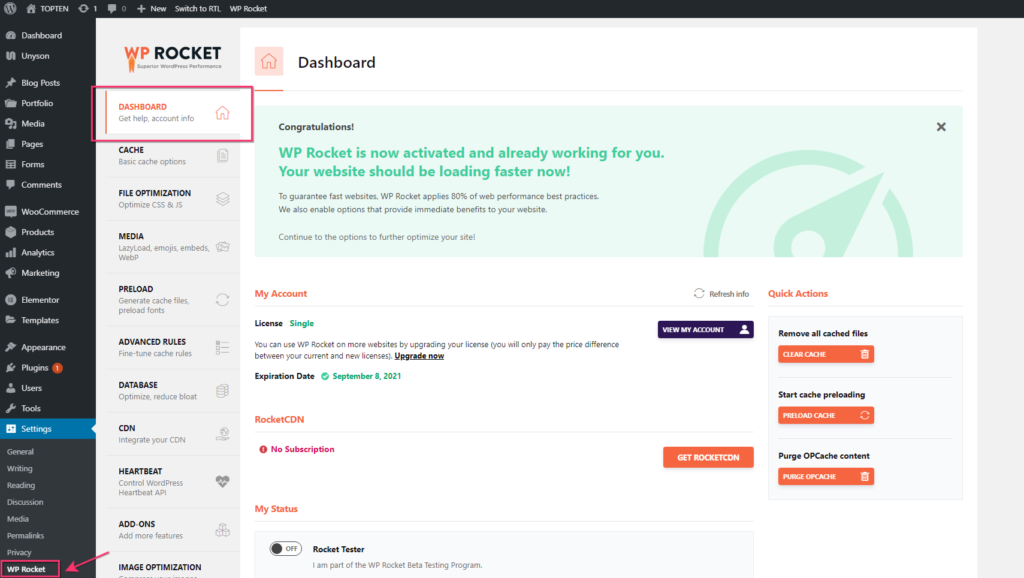
Essentially, this performs such speed optimizations as
- static files compression (GZip) – to make the total size of data to be delivered smaller (we have a full tutorial on how to enable GZip compression in WordPress here)
- enables a file cache (including cache preloading) – to put less stress on the server (fetching a prerendered copy of each page)
- Google Fonts optimization – to make sure heavier fonts are loaded quickly),
- lazy loading – such that images are only loaded when the user scrolls down to the section of a page where the image is required
- Minification and combination – shrinking the size and combining text assets to deliver them faster to the end-user
- Defer JS loading – such that the page renders quickly instead of waiting for all the assets to download. This is something we’ve covered on CollectiveRay.
- Integrates and enables a CDN – such that your heavier media is delivered faster
- DNS prefetching – to reduce the time it takes to resolve the source of 3rd party content
All the above might sound like gibberish to anybody who is not involved in infrastructure optimizations, but in reality, these are all the things you need to do to make your website load faster.
The great thing is that with WP Rocket you don’t have to do the heavy lifting and the configuration – it’s all done for you! We highly recommend trying out this plugin, which has been rated as the best way to make your website faster.
Comet Cache
Comet Cache adds the perfect blend of speed, simplicity, and reliability. It’s simple, effective and there’s NO learning curve. No technical mumbo jumbo standing in your way. Just a few clicks and Comet Cache is ready-to-go. Anyone can do this in just 2 minutes.
The Comet Cache plugin is a reputable and popular solution with both free and paid versions. The paid version starts at $39 and goes all the way up to $139. This a one-time fee, but you can pay additional fees if you’d like extended customer support. Comet Cache has similar features as the previous caching plugins, but one area it excels at is the documentation.
Comet Cache is fairly easy to install and simple to move around the dashboard. However, it beats out the majority of the competition in the documentation department. Even on the regular WordPress plugin page, you’ll find dozens of links and FAQs to guide you and educate you about caching.
Why is this one of the best WordPress caching plugins?
- Comet Cache features a fast configuration and a reasonable backend for setting up your caching within minutes.
- Caching can be done on posts, pages, categories, or tags.
- The paid version offers automatic and intelligent cache clearing. This way you have the option to set the caching preferences upon installation and forget about them into the future.
- RSS feeds can be cached to ensure that none of your content syndication is delayed.
- Most of the primary features are given away for free, so you don’t necessarily have to upgrade to the paid version.
- The premium version is just about the same as what you would get from WP Rocket, so we’d recommend testing out both to see which one you like the best.
Check out the official Comet Cache documentation and community forum when configuring and testing it on your WordPress site.
WP Super Cache
WP Super Cache is yet another example of an open-source caching plugin with millions of installations. Some people might be more keen on installing WP Super Cache, simply because it comes from the folks at Automattic.
Anyway, WP Super Cache is free and open-source, with no upgrades needed after the installation. It works efficiently by creating static HTML files and serving those files instead of the heavy WordPress PHP scripts. A benefit of going with WP Super Cache is that it offers three caching modes. One of them is called Simple Mode, which is what the average WordPress user would go with since it’s the least risky. However, one of the modes is called Expert Mode, where you’re able to super cache your files with some modifications to the .htaccess file. It’s great for advanced developers who would like more control over the caching process.
As suggested, most users will go with the Simple caching mode. With this configuration, the WP Super Cache Plugin is easy to set up on any WordPress theme such as TopTen or Seosight, allowing for the compression of pages, simple caching, cache rebuilding, and CDN support. Not only that, but you’re able to identify known users and not cache the pages for them if needed. The extra homepage checks are also useful for when you’d like to ensure your primary webpage is at its most optimized.

One of the best parts of WP Super Cache is the garbage collecting. In short, your cache directory actually fills up over time and can cause your site to run slower. Therefore, WP Super Cache completes an automated garbage collection process on a regular basis, cleaning out the old files and keeping your site optimized.
Why is this one of the best WordPress caching plugins?
- WP Super Cache has the reputation and track record to ensure that it’ll provide excellent caching services for all of your websites, regardless of size.
- It’s a free, opensource product from Automattic. So, you know that updates will come out regularly and the plugin is not going away anytime soon.
- The backend interface has most of the settings you need filled in already. It’s pretty easy to comprehend and activate, even for beginners.
- The plugin uses a process of garbage collecting, where it clears out old files from the cache so that your caching process doesn’t slow down your site in the process.
- WP Super Cache has been integrated with a unique CDN setup for a better distribution of your files.
- You have three caching modes to choose from, from Simple to Supercaching. This opens up opportunities for all skill levels, since the Simple cache is best for regular users, and the Supercache mode allows for advanced users to really speed up their sites.
- The plugin has a unique feature called Cache Rebuilding, where the cache on your blog isn’t cleared whenever a comment is posted. Instead, it rebuilds the cache and serves up the old page to other users.
Unfortunately, they don’t have any official documentation, although they do have a lot of information on their repository page.
Caching third-party resources
After performing all of the changes described in this article, you might still obtain a bad score when testing your website’s speed using various tools. Google PageSpeed Insights can give you a bad score because of many third-party scripts or services that run behind your website. These scripts don’t have a long expiration time because of a multitude of reasons.
If you will still get messages regarding your Leverage Browser Caching in WordPress after following all possible tips, there is nothing much you can do besides eliminating scripts that you don’t use. A maximum of three scripts should be just enough for a website, so make sure to clean your list.
After making this change, everything should work fine, and the loading time of your website is supposed to be as close as possible to perfection. In case you encounter a problem that is very specific, and it doesn’t have anything to do with third-party scripts, you should get informed about it and see what setting causes the issue.
While it is fairly easy to apply the above setting, you’ll find that even after you perform the above changes, you will still keep getting this message in website speed testing tools and Google Pagespeed Insights.
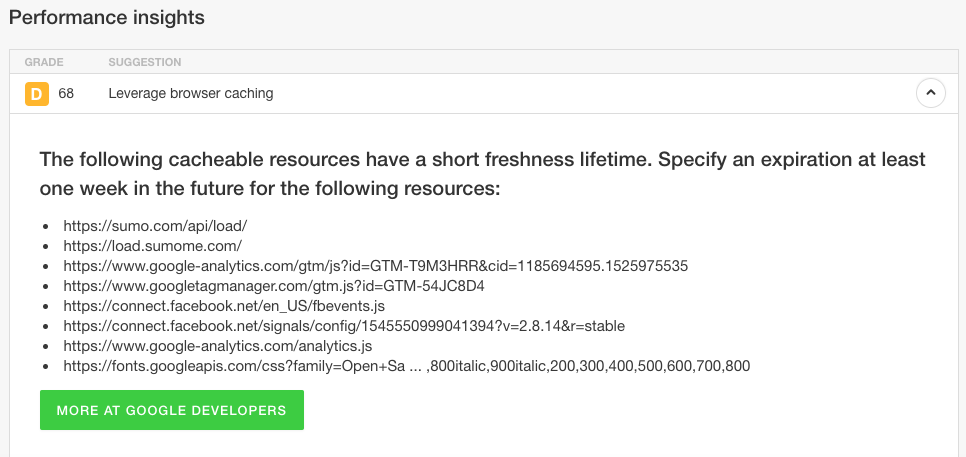
This is because, most 3rd party scripts and services do not specify a long expiration time – for various different reasons.
You have no control over these scripts, unfortunately, so we strongly advise you to use the MINIMUM 3rd party scripts possible. If you can live without the script, eliminate it from your website. By choosing to include it, it will be dragging the loading time of your pages down.
Final Thoughts
Why is it so important to leverage browser caching?
Leverage Browser Caching helps in improving the web performance testing score. Remember, these settings are only for building basic guidelines and understanding among WordPress users. Aside from this, there are a number of techniques that can help individuals to achieve a faster website within no time, in which the most important is choosing faster WordPress hosting.
Well, by putting rules in place for how browsers should cache your website, you can dramatically improve your site’s page speed. There are WordPress plugins or snippets of code you can easily use to define how long a browser should cache different elements on your site.
Once these rules are in effect, your website should automatically load faster for most users, especially on repeat visits. In order to test the effectiveness of your caching on page speed, you can always turn to a free tool like Google’s PageSpeed Insights, or a paid option like GTmetrix.
While page speed isn’t the be-all and end-all for ranking or user experience, it makes a huge difference – and the good news is, it doesn’t take long at all to properly enable leveraging browser caching for your WordPress website.
